Transferring Your Drive Contents & Gmail to a New Account
This process is especially useful for students who a graduating or going to another district who have files in their Drive accounts they would like to continue to use.
District G Suite accounts, both students and staff, are deactivated shortly after the user is no longer in the district. So if they wish to continue to access their data, they need to take steps.
Please note that if you transfer Google Docs, Slides, Sheets, etc., you are actually creating a copy of each in the Drive of your personal account. You are not sharing the file you have in your district account. So what this means is that if you complete the process below, and then open a file in your district Drive and make a bunch of changes, those changes will not be made to the file that is in your personal account, because it is a separate copy.
So students, you should wait to do this process until you are close to the end of the year or date you are leaving the district. If you do it early, and then continue to create new files in your district Drive account, they will not show up in your personal account.
If you run into any problems with the transfer, let me know (mdalton@maloneschools.org) and I will see if I can help.
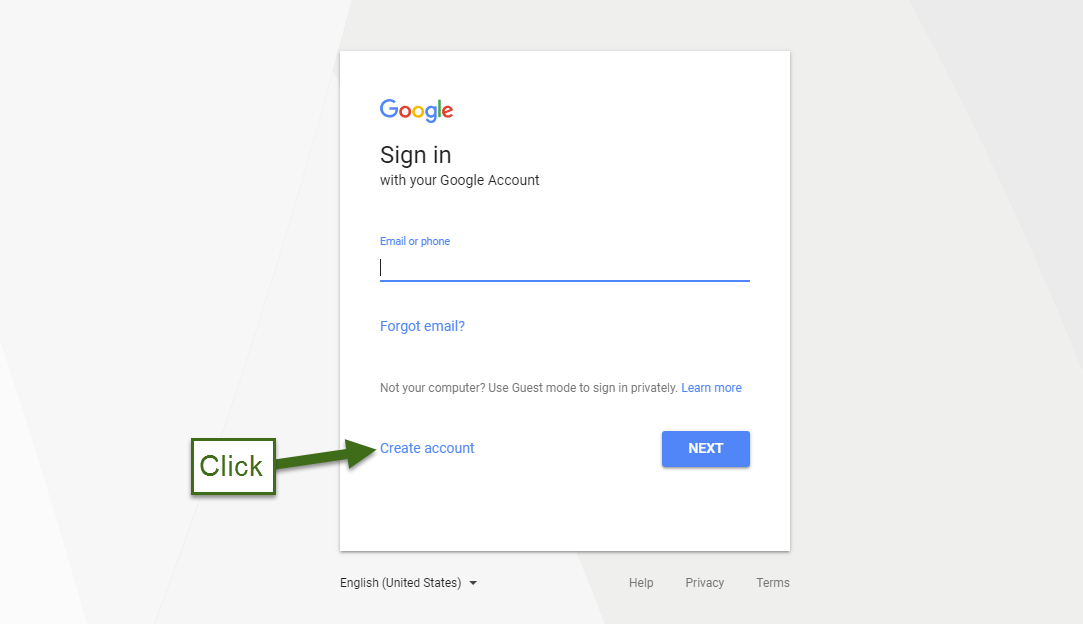
Step 1: Create a new Google account.
If you already have a personal Google account that you would like to use for this process, skip to step 2.
Personal Google accounts, like G Suite for Education accounts, include all the core services like Drive and Gmail. They are free.
**If you are a student, and need to create a new account, you will need to do this on a Windows computer, Mac, or other personal device (like a smartphone or tablet). Your school Chromebook will not let you switch Google accounts, so this won't work if you're trying to use a school Chromebook or Chromebox.**
Then on the next screen:
From there, it's just a matter of filling in the form to create your account. There are some steps that are optional, like providing a backup email address and/or cell phone number. You don't have to fill those in, but if you do, they can be used to get access to your account if your forget your password.
Step 2: Start the transfer process.
Log into your school Google account, and go to takeout.google.com/transfer. The "/transfer" part of that is extremely important. If you leave it off, it will take you to Google's tool that will let you create a zip archive of all of your data. The problem is, there is no easy way to get the stuff from that archive into your new account, so be sure to use the whole address.
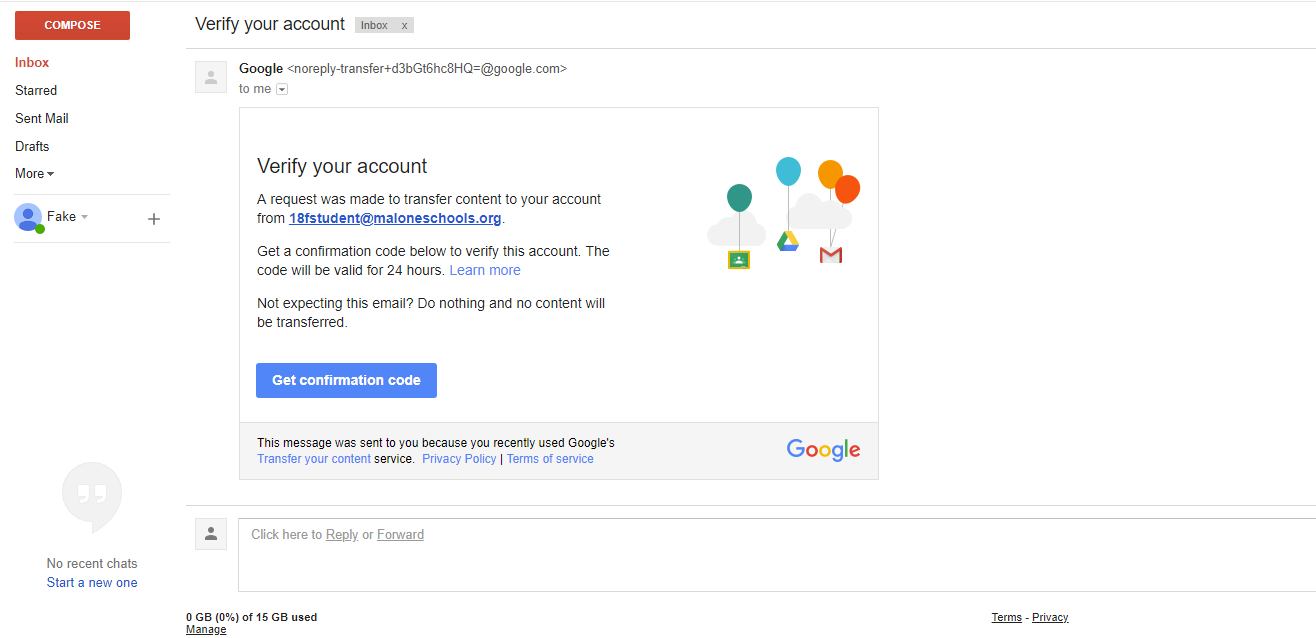
Once you're logged in and there, you'll see:
Once you're logged in and there, you'll see:
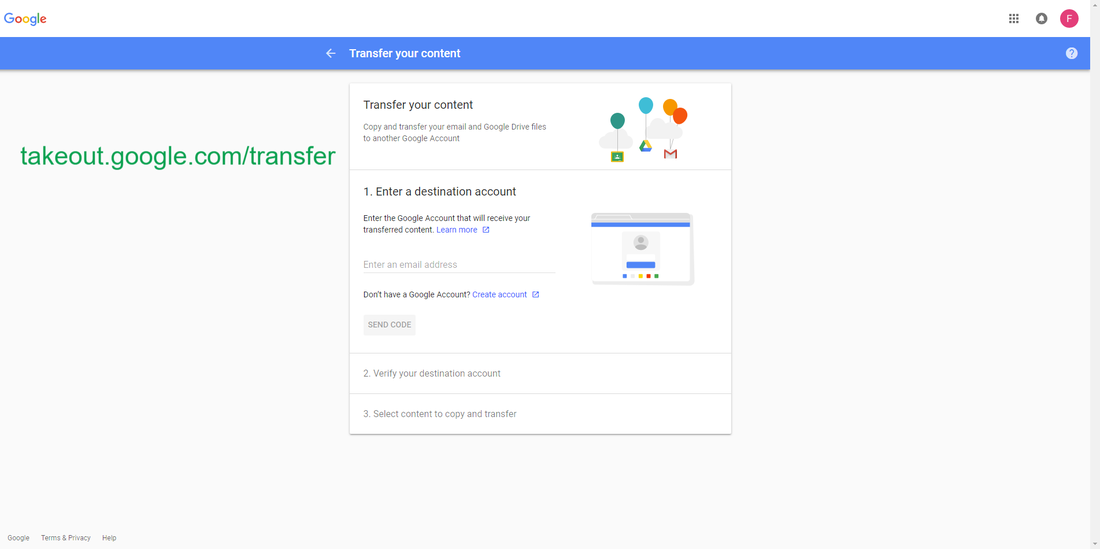
Type in the address for your personal Google account where it says, "Enter an email address," and then click the "SEND CODE" button, which will turn blue once you have typed an address in.
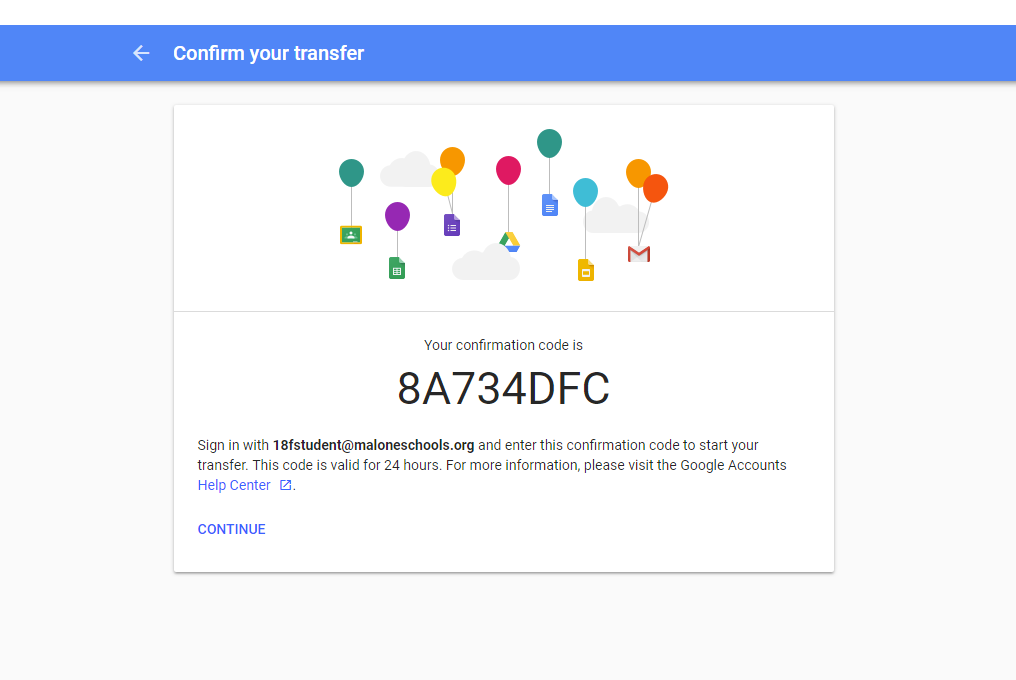
You will now be seeing this:
You will now be seeing this:
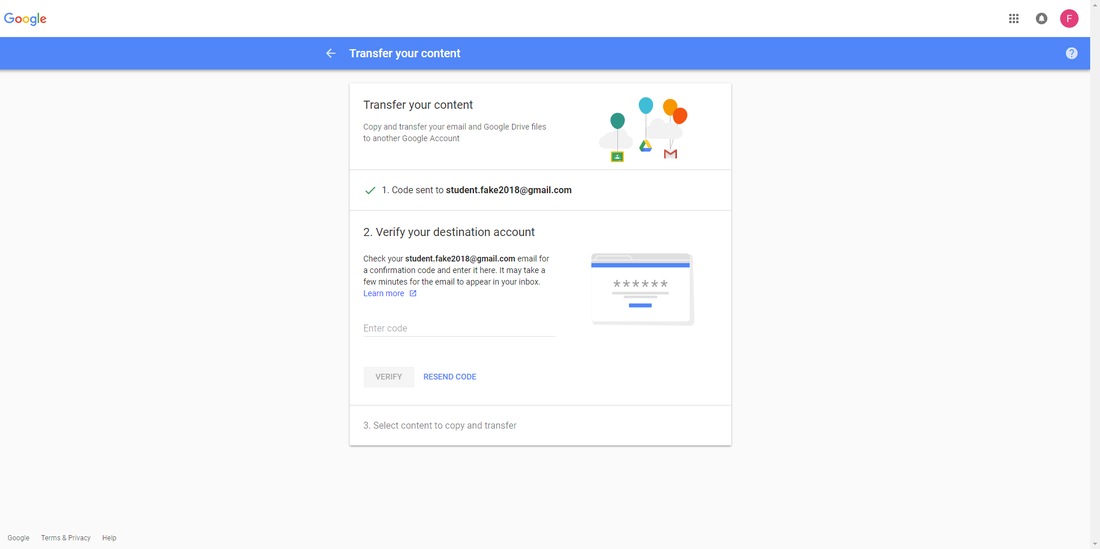
Step 3: Get the transfer code.
At this point, you need to log into your personal Google account's Gmail (gmail.com). If you are on a Windows computer or Mac doing this, the easiest way to do this is to open a different browser, like Microsoft Edge/Explorer, or Firefox, or Safari, than the one you have been using so far, which will be likely be Chrome, and logging into the personal account. This way, we can keep the Chrome browser with the transfer window open, without the process of signing into a different Google account messing it up.
**Again, if you are a student, you will need to do this step on something other than your school Chromebook as it will not allow you to log into your personal Google account. So use your phone, a tablet, a Windows or Mac computer to log in and check your personal Gmail.**
Once you're logged in, go to your Gmail inbox, and you should see an email from Google with your transfer code. If there is nothing in your inbox, you can click the "RESEND CODE" link in the transfer box in the Chrome browser (see the picture above). Open the mail, and you'll see this:
Click the blue "Get confirmation code" button in the email, and it will open a new window that will look like:
Type that code into the blank in the transfer box in the Chrome browser, DO NOT COPY/PASTE IT. For some reason, trying to copy/paste will often cause the system to tell you the code is invalid and automatically send a new code to your personal account's Gmail. So type it into the box manually to be sure.
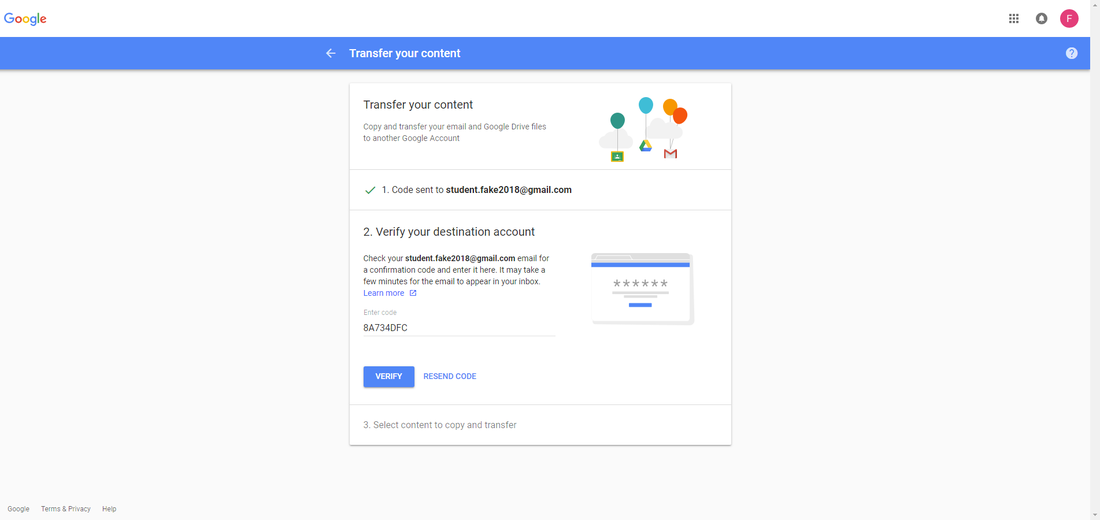
Click the "VERIFY" button once you have the code typed in.
Step 4: Decide what you're transferring.
Once you have entered the confirmation code, you'll see this:
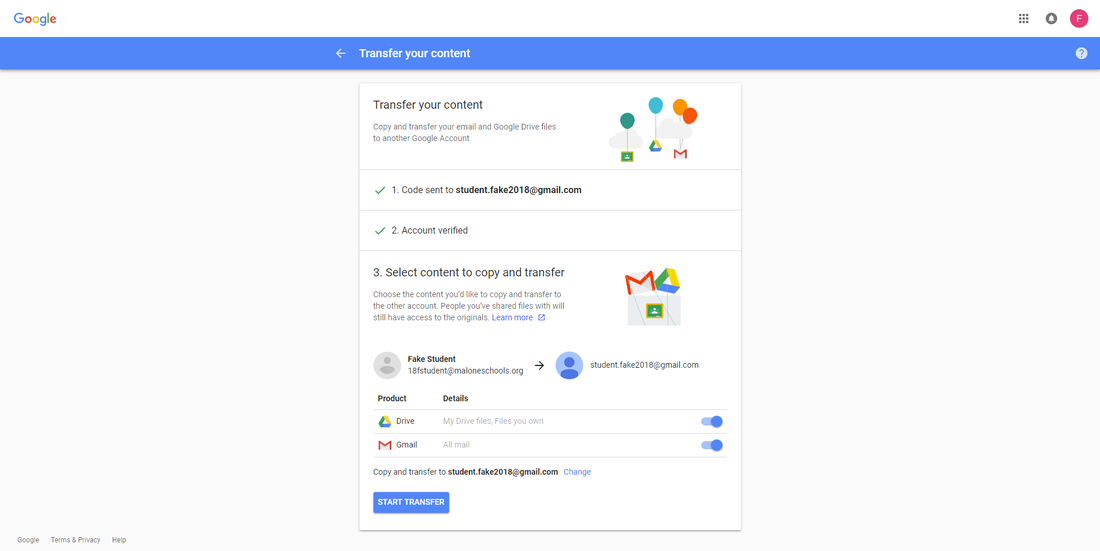
At this point, you can just hit the "START TRANSFER" button, and you would be fine. If you are only interested in your Drive files, though, and don't need or want any of the email from your district account, you could move the slider next to Gmail to turn that off. That way you will only transfer your Drive contents.
Once you click the button to start the transfer, you will see:
Once you click the button to start the transfer, you will see:
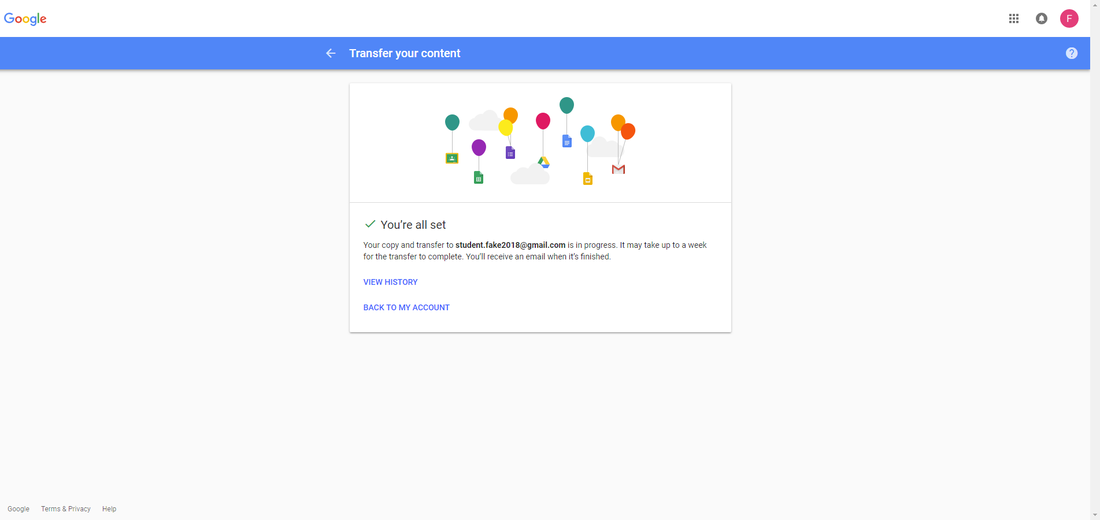
Step 5: Access your stuff.
The message in that last step says it could take up to a week for the transfer to complete. The reality is that it will probably only take a few minutes, unless your Drive and Gmail contain massive amounts of stuff.
Your mail will simply show up in your personal account, just as it did in your district account's Gmail. There will be a tag next to each message telling you when it was transferred.
Your Drive contents will show up in your personal Drive account like this:
Your mail will simply show up in your personal account, just as it did in your district account's Gmail. There will be a tag next to each message telling you when it was transferred.
Your Drive contents will show up in your personal Drive account like this:
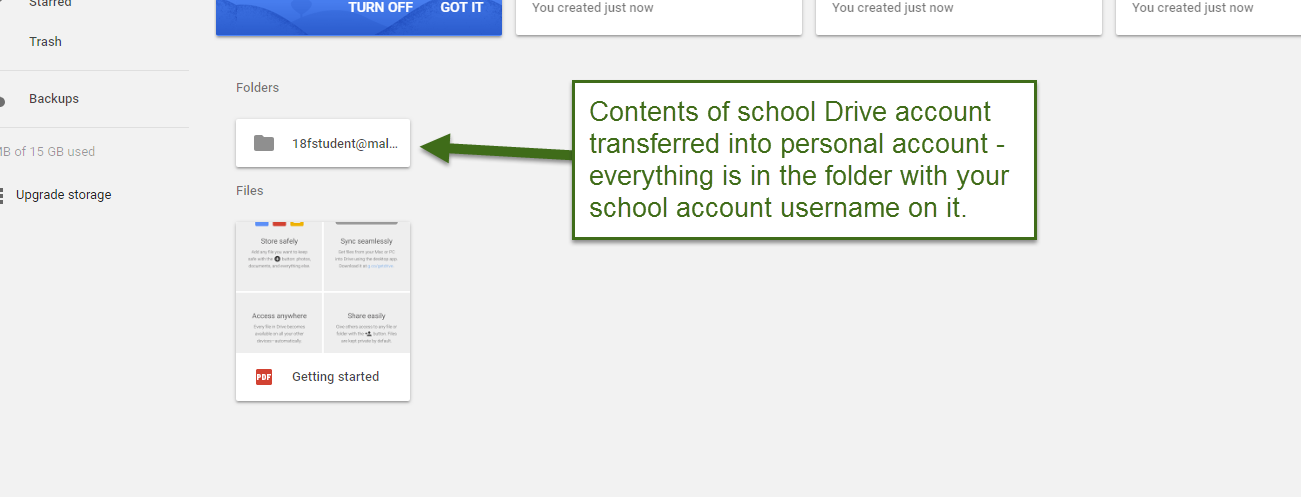
If you had the contents of your district Drive organized in folders, all of that organization will still be there inside the folder you see above.